Metasploit –
Sitting Ducks
The purpose of this report is to demonstrate
some techniques used to break in Metasploitable
2
and Kioptrix
using Metasploit and what can be
achieved in the compromised machine,
insertion of nmap scan results into a
database, three techniques not discussed
or demonstrated during
our lecture on Metasploit – and to tell about a real case where I used
Metasploit.
This report is for the Penetration Testing Course taught by Tero
Karvinen.
-------------------------------------
Installation
First, I installed PostgreSQL through the Kali Linux
terminal, started the service, checked what port the
service is listening through and closed incoming traffic to it by running the
following commands:
·
sudo apt
install postgresql
·
sudo
systemctl start postgresql
·
sudo ss
-ltn
·
(If UFW is not
installed, then sudo apt install ufw)
·
sudo ufw deny
<port>

Then, I initiated the database for Metasploit
and started the Metasploit Console by running:
·
sudo
msfdb init
·
(sudo)
msfconsole
(msfconsole can be lauched with the sudo
prefix, in order to avoid permission issues with some modules)

Now that Metasploit is configured, I downloaded
metasploitable 2,
installed it and configured it to be in a
closed network with my Kali in my Oracle
Virtualbox environment running on Windows 10:

I extracted the contents of the zip and clicked
on "New" in the Virtualbox manager:

Then, in the menu that opened, I selected
"Use an existing virtual hard disk file" and clicked on
"choose a virtual hard disk file…":

Then I selected "Add Disk Image" and
navigated to the extracted folder:

After this I configured the machine to be of
Type Linux and version as Ubuntu 32-bit (works as 64-bit as well) and
configured the vulnerable machine to have around 3GB memory:

Last thing to tweak in the VirtualBox Manager
was the Network of both of these machines to be
attached to a Host-Only network, which means that the machines have a
connection to each other,
but not outside:


Now that the machines are ready, I started them
and tested that the machines can communicate.
First I logged in to Metasploitable 2 using the
default credentials msfadmin:msfadmin – and checked
the IP-address of the
machine:


Then, on my Kali machine, I ran ipcalc
on the target machine's IP-address, in order to make sure it's detectable
and that it is in my internal network only:

-------------------------------------
Enumeration
Now that everything is
running fine, we can start enumerating the machine to see if there is
anything Metasploit could exploit for us.
First, we create a folder to store our information on the machine and then run
an Nmap scan to find out all the
services that allow inbound traffic:


Now that's a lot. Let's start with the simple
ones.
-------------------------------------
Exploitation
=-=-=-=-=-=-=-=-=-=
Port 21 - vsftpd
The first service we'll be exploiting is the
FTP service running on port 21, simply by typing
search vsftpd 2.3.4
In the Metasploit console, we find a backdoor vulnerability for the version of
ftp service running
on the vulnerable server.
Then it's as easy as setting the target host IP number and executing the
exploit – and we're in.

=-=-=-=-=-=-=-=-=-=
Port 6667 – UnrealIRCd
The next service I wanted to exploit was UnrealIRCd,
which is a multiplatform open-source IRC server.
And funny enough - this service also has a backdoor!

=-=-=-=-=-=-=-=-=-=
Port 5432 –
PostgreSQL
This time around when searching for exploits
for this service we end up with more results than
previously. Nevertheless, the first exploit in this list, is the one we need –
and is also the first one
to utilize the meterpreter.
The only parameter we need for this exploit to work on our target, is it's
IP-address:


By entering help in the meterpreter, we can get a list of
commands it can run.
Out of all of these I found the webcam commands the most interesting were the
webcam and microphone
commands, which after reading the meterpreter documentation sounds horrifying,
since there is no way if my
microphone is being listened to or webcam is being watched.


-------------------------------------
Actions on
Objectives
For this section I decided to create an ssh access to the vulnerable serven by generating an rsa
keypair.
This can be achieved in two ways:
1.
Manually
2.
Using
the metasploit sshkey_persistence - module.
=-=-=-=-=-=-=-=-=-=
1. The
Manual Way
First, we have to get
a shell from a service that is run as root through Metasploit.
The service I chose was vsftpd 2.3.4:

Then, we generate an ssh-keypair and add the
public key to authorized_keys:
ssh-keygen
cd /root/.ssh
cat id_rsa.pub >> authorized_keys

Now what's
left to do, is to copy the private key, the way I went about this had the least
hassle:
First, I read the private key that was generated for root, then I went I pasted
the private key into a file on my machine
using vim and :set paste in order to keep the indents.
cat id_rsa
CTRL + SHIFT + C

vim id_rsa
:set paste
i
CTRL + SHIFT + V
:wq

Then I set the
permissions ssh likes to the file and connected to the machine using the
private key:
sudo chmod 600 id_rsa
ssh -i id_rsa root@192.168.56.101
(Flags: -i stands for identity file)

And now we have access to the target
machine whenever we want.
=-=-=-=-=-=-=-=-=-=
Using
Metasploit
Now that we know how to make it manually, we
can see how Metasploit automates this.
This section is done according to Mastering
Metasploit – Third Edition by Nipun Jaswal
If we repeat all the steps up to the Metasploit exploit to gain access to the
machine as root
and press CTRL + Z to background the session, we get back into Metasploit while being able
to return to our
session at any moment:

Now sessions in Metasploit are exactly what you
think: Shell sessions and you can background them in order to manage modules in
Metasploit
among others. Now that we established what sessions are, we use a post exploit
called sshkeys_persistence, set the SESSION as 1 and USERNAME to root:

Now that the options are set, we can run the exploit:

Now, all that's left is to copy the private key path and connect using the ssh
command from the manual exploitation:
ssh -i
/root/.msf4/loot/20200503090628_default_192.168.56.101_id_rsa_248541.txt root@192.168.56.101
But turns out, Metasploit forgets to set the proper permissions for the
identity file and we get an error:

This is easily
fixed by running
sudo chmod 600 <path-to-file>
And thus, we
get access as root on the vulnerable server:

If for some reason one would like to return to the Metasploit session instead,
they can run
sessions -i <session number>
In the Metasploit window in order to be return to the session:

-------------------------------------
New Target – Kioptrix Level 1
First, I installed Kioptrix and made it VirtualBox compatible by using this
tutorial.
NOTE: The only difference is that I set Kioptrix to use the Host-Only
network adapter.
This time around I wanted to store the nmap scan in the database, but we do not
know the IP-address of the machine.
I did this by simply guessing, since my kali ip address ends with .102 in the
subnet and metasploitable ended in .101,
then Kioptrix ends in .103 and when running ipcalc to test it, I was correct:

Now that the IP is confirmed, we can run a db_nmap scan on the IP-address and view the services:


Now, I decided to go after the smbd service running on port 139. In
order to exploit it, we first need to find out the version:
search smb_version
use 0
options
set RHOSTS <ip>

Now that we
know the version, after a bit of googling I found this CVE.
Next, we need to find the module and run it, but I ran into a problem.
The session refused to start and turns out I had to set a payload:


And just like that, we got root access on the machine.
-------------------------------------
Scanning
the HackTheBox Network using db_nmap
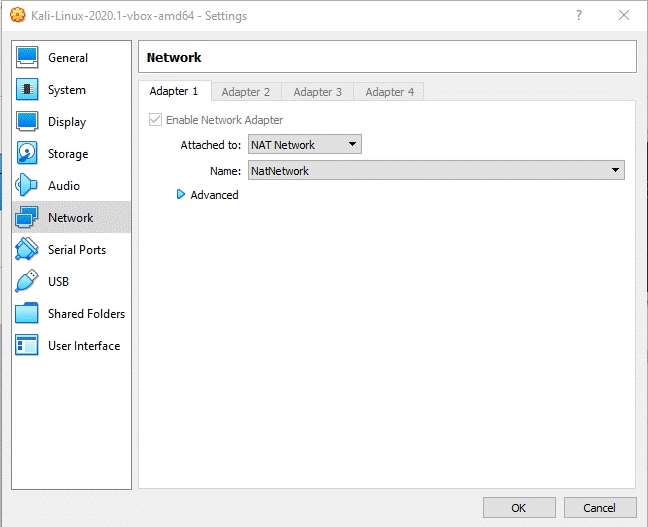
First, in
order to be able to connect to the htb network, I had to change my network
adapter settings
in VirtualBox:

Now that we can connect to the outside of our home network, we can establish
the openvpn connection and
start scanning, but first, we create a workspace:
workspace -a htb
workspace htb
(flag -a stands for add workspace(s))

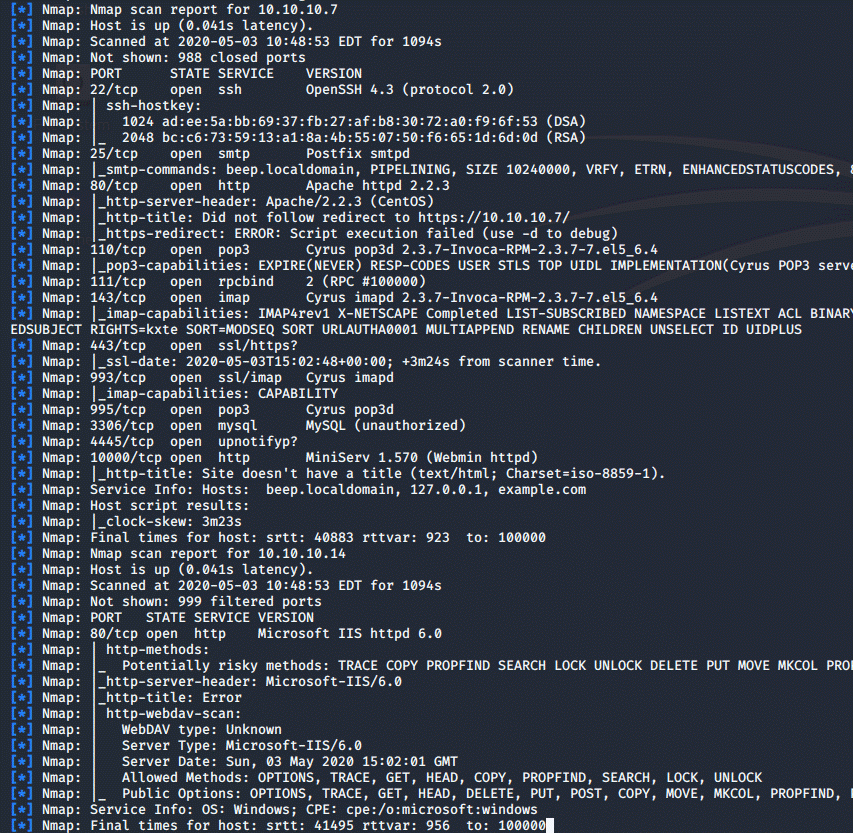
And now we can
start scanning:
db_nmap -sV -A 10.10.10.0/24
With the end results looking like this:

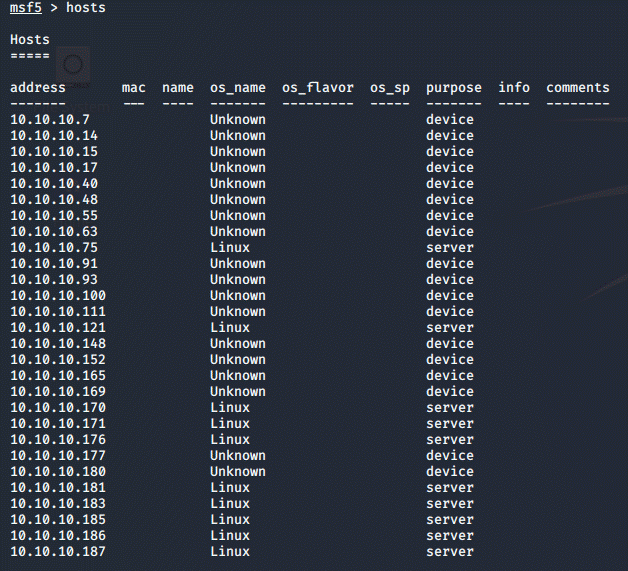
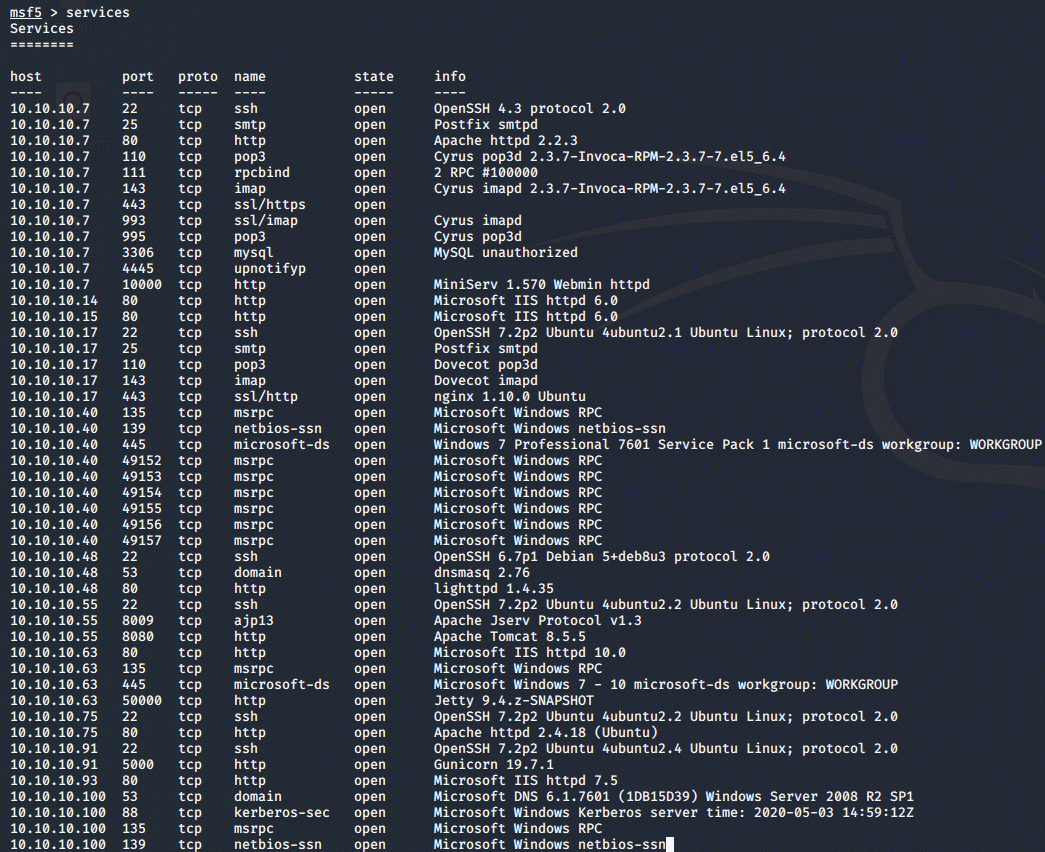
But Metasploit allows us to filter through these results in a very comfortable
way,
by running hosts or services we can see different data, displaying IP-addresses
only, or the different services running:


-------------------------------------
My
prior experience with Metasploit
I personally have mixed feelings about
Metasploit, it is a very useful tool – and there's no denying that.
But there's something I enjoy in crafting exploits and finding them online more
than running a couple of commands
in order to have root access on a machine. Even though I like msfvenom a lot.
But there is a case that happened some time ago where I did use Metasploit. It
was, the currently retired machine, Resolute. It was for the
user who was part of the DnsAdmins group I had under control. And Metasploit
had a module for privesc from that user to Administrator through smb.
I unfortunately don't remember much more about it, but after not using
Metasploit for a while I was astonished by how easy it
was to own the system, with an exploit from 1999 no less.
-------------------------------------
This concludes my report on
Metasploit, I hope you enjoyed it.
Return to Main Page